Monday, September 26, 2011

Disabling the SharePoint 2010 ribbon

Oftentimes, web designers need the entire screen to really pull out all the stops on a web design for a customer. This is especially true of public, consumer-facing web portals.

SharePoint 2010 presents a wonderful tool at the top for managing content called the ribbon. However, it is in the way, and public, anonymous users don't generally need the ribbon. That space is more valuable presenting a message to a customer than in providing technical functions to someone that doesn't need them.

So, how do you get rid of it? There's no way to simply disable it out of the box. To do so requires the typical UI customization approach to making SharePoint 2010 sing. However, you can't get rid of it FOREVER or your customer won't be able to manage content. So, it's a little trickier than meets the eye.

So, let's get down to it.

First, you need a way to manage content, so plan accordingly. In the situation below, I'm going to assume that only the public, anonymous URL is going to need to have the ribbon disabled. I'm going to use the default zone of the SharePoint application to manage content. You could also deploy a third zone, an extranet, wherein your content managers could log in via Forms Based authentication and manage content.

So here we go:
  1. Set up your application.
  2. Deploy it to a public, anonymous zone - the Internet zone. You'll now have one application deployed to two zones - the default and the Internet zones.
  3. Find the master page that drives the screens on which you need to hide the ribbon. If you have more than one master page in your site collection or solution you'll need to implement this solution for each one.
  4. Add the following style to a stylesheet that is always included in the master page. (I avoid inline styles like the plague, and don't update the style sheets native to sharepoint or you'll get your fingers broken by the Best Practices Enforcement Bureau.)

    /* Ribbon row - hide by default - this is turned on in the master page jquery file for content editor access */
    #s4-ribbonrow{display:none;}

    *This setting turns OFF the ribbon row. It will ALWAYS be off unless you do #5.
  5. Add the following code to some javascript that gets executed by your master page.

    var ribbonRow = document.getElementById("s4-ribbonrow");
    if(window.location.href.indexOf('www.yourawesomewebsite.com') == -1)
    ribbonRow.style.display = "inherit";
    This code will turn the ribbon ON if it does not contain the base url of your public site.
That's it! No "code". No custom assemblies. No screwing with base SharePoint components.

Now, at this point, you can see the fundamentals of how you might go about programatically turning it on and off. It's simple. You can add a UI element such as a button or link - even make it audience-aware, that toggles ribbonRow.style.display between "inherit" (show) and "none" (hide). Very slick. So, if you have a scenario say - on your intranet - where you have a large audience consuming the information only and others that need to update it via the same URL, you have a really slick option.

That's enough nerdy stuff for now. Back to my hole.

Sunday, July 3, 2011

Building Snake Traps with Savannah


This afternoon Amber, Keegan, and Kennedy went out in the back yard to play in the kiddie pool and sprinkler. When Amber reached down to grab the hose, lo and behold, she nearly grabbed a snake!

I was inside when I heard the screech. Amber came in and expressed her concerns. I went to the bush where the snake had slithered to and flushed him out. "Good" I thought. "He's gone."

Not quite. I watched as he slithered into a small hole underneath the power supply for the air conditioner ON OUR HOUSE. After further inspection it was determined he was not in the box, but in the walls of our home.

This needed remedied. Fast.

I decided to build a snake trap.

So, Savannah and I headed to the basement to build a snake trap.

The design is simple: You build a tube long and wide enough to hold the snake, then build a one way trap door at the end. You butt the trap up against the hole and wait. Hopefully when he comes out he'll go down your trapped tube and get stuck. Mwwwaaaaahahahahaahhahahahah!!!!

Materials:
  • 1 cardboard wrapping paper tube
  • tape (packing, duct, etc - something that can withstand the elements a wee bit)
  • 1 toothpick
  • 1 piece of plastic (from something in the trash!)
  • 1 sharpie
  • 1 rubber band
  • scissors
  • Rocks, logs, etc to hold the snake trap in place.

Step 1 - Cut the end cap and trap door
Stick the end of your tube on the plastic and draw a circle. Add a tab about a quarter inch wide to the edge of one circle.

Cut the circles, leaving the notched tab on one of course.
Play around with the trap door in the tube. Make sure it is not too tight that it can't open and close but not so loose there is a big gap between the sides.

The other circle is for the end cap and needs to be a little bigger than the end of the tube.


Check your baby.


Step 2 - Assemble the trap door

Cut a slit about a quarter inch long extending from the edge of each tab on the trap door parallel with the edge. This will hold the rubber band which will snap it shut after the snake has passed over the door.

Cut a slit long enough for the tab to fit through from the inside of the snake tube. I used the point of my scissors.

Slip the rubber band through the two slits.

Slide the trap door into the tube and insert the tab into the slit you just cut. Make sure the trap door swings down the long portion of the tube. Pull the rubber band out the open end.

Step 3 - Make a rubber band anchor point.

Find a point where you can anchor the rubber band that will pull the trap door closed but not be so tight it can't be easily pushed open. Poke two holes fairly close together at this point. Break off 3/4 of the toothpick and slide the larger piece through the two holes. (This keeps the toothpick out of the snake's way.)

Pull the rubber band through the open end and hook it on the toothpick at the anchor point.

Test your trap door. Does it open easily? Does it close easily?

Once your are satisfied with the trap door's operation, tape down the tab of the trap door you inserted through the slit.

Take the 1/4 remainder of the toothpick. Insert it on the opposite side of the tube from the tab far enough that it engages the trap door when it closes. This will prevent the snake from getting out once the trap door closes. Secure it with some tape on the outside of the tube.

Step 4 - Install the end cap

Put the end cap on the end of the tube opposite the trap door. Tape it on the end securely so it can't be pushed out by a snake.


Step 5 - Set the trap

Go to your snake hole and butt up the end of the tube with the trap door on the hole. The side of the tube with the tab sticking out should be towards the top. (This way the door opens easiest for a snake traveling on the bottom of your tube.) Make sure to involve your 5 year old son for a real kick.

Prevent it from rolling or moving vertically by placing logs on either side and over the top. 5 year old boys are very good at collecting logs for you.

Step 6 - Wait

Wait for the snake. They come out and night often so check in the morning. You may be able to bait the snake with some insects as well.

All in all making and setting this trap took about 30 minutes.

Tuesday, June 28, 2011

Jonah's Revenge

I finally decided on a name for the kayak:

"Jonah's Revenge"

Jonah's Revenge takes its name from the nature of the boat and the water on which it will be used. It will be used for fishing while navigating some tempestuous waters on longer trips. In my case, I'll be fishing between whitewater stretches on the New River in West Virginia.

Kinda like maybe what Jonah was doing while trying to avoid his mission from God.


For those not in the know, Jonah was a prophet in the Bible that was sent to give a message from God to an enemy city. He decided to bail on his mission from God - no, not like the Blues Brothers.


Jonah had a bit of an anger management problem, akin to the angry whitewater of the New River. Jonah stormed onto a ship to return home, but God sent a huge storm, and the guys on the boat ended up throwing him overboard to save themselves. A big fish then swallowed up him up and vomited him onto land.

Jonah got the point and returned to deliver God's message to the city. If the city didn't change in 40 days, God would destroy it. He then went outside the city to await its final destruction.

To Jonah's somewhat dismay, the city repented and God spared it from destruction. We don't know much of what happened with Jonah after that. Perhaps he lived happily ever after.

Or, perhaps, given his angry disposition, he returned to sea to exact vengeance on fish while navigating tempestuous waters.

Thus, the nature of the kayak.

Wednesday, June 15, 2011

Pimp My Kayak

This summer I'm taking a 3 night kayak adventure with 3 of my best friends. So, I bought a kayak.

I decided to get the most inexpensive kayak I could find that was capable of making a journey through class I, II, and III rapids, could serve as a fishing kayak for the small lake we live next to and navigate Indiana rivers, small lakes, and creeks for fishing.

I purchased the Potomac 100 ES at Dick's Sporting Goods. I got it on sale and used two $10 off coupons. Then, I got an inexpensive, mid-length paddle.

Not one to have a run-of-the-mill boat, I decided to "Pimp My Kayak" for the purpose of fishing and additional gear for a mid-length trip of 3-4 days.

ItemCostSource
Kayak$159Dick's Sporting Goods (w/ coupons)
Angler Kit - includes anchor, 2 flush mount rod holders, 1 anchor cleat, 1 Scott rod holder$42yak-gear
Marine Goop$5Menard's - paint / adhesive section
Anchor Trolley2 caribiners - $2
1 O-ring = $1
1 pulley = $1.50
50' yellow cord - $3
Menard's - boating section
Folding Paddle Clips$8yak-gear
1 Scotty rod holder (baitcaster)$15Gander Mountain
Rigging Kit - 4 pad eyes, 4 bungee terminals, 4 j-hooks, 8' 1/4" bungee$9.99Bonanza - rats502
220 cm Paddle$35Dick's Sporting Goods
6 3/8" pad eye packet$2Bass Pro Shops
2 Bungee Clips$1Bass Pro Shops
Washers, Machine Screws, Zip Ties, Nuts I had on hand
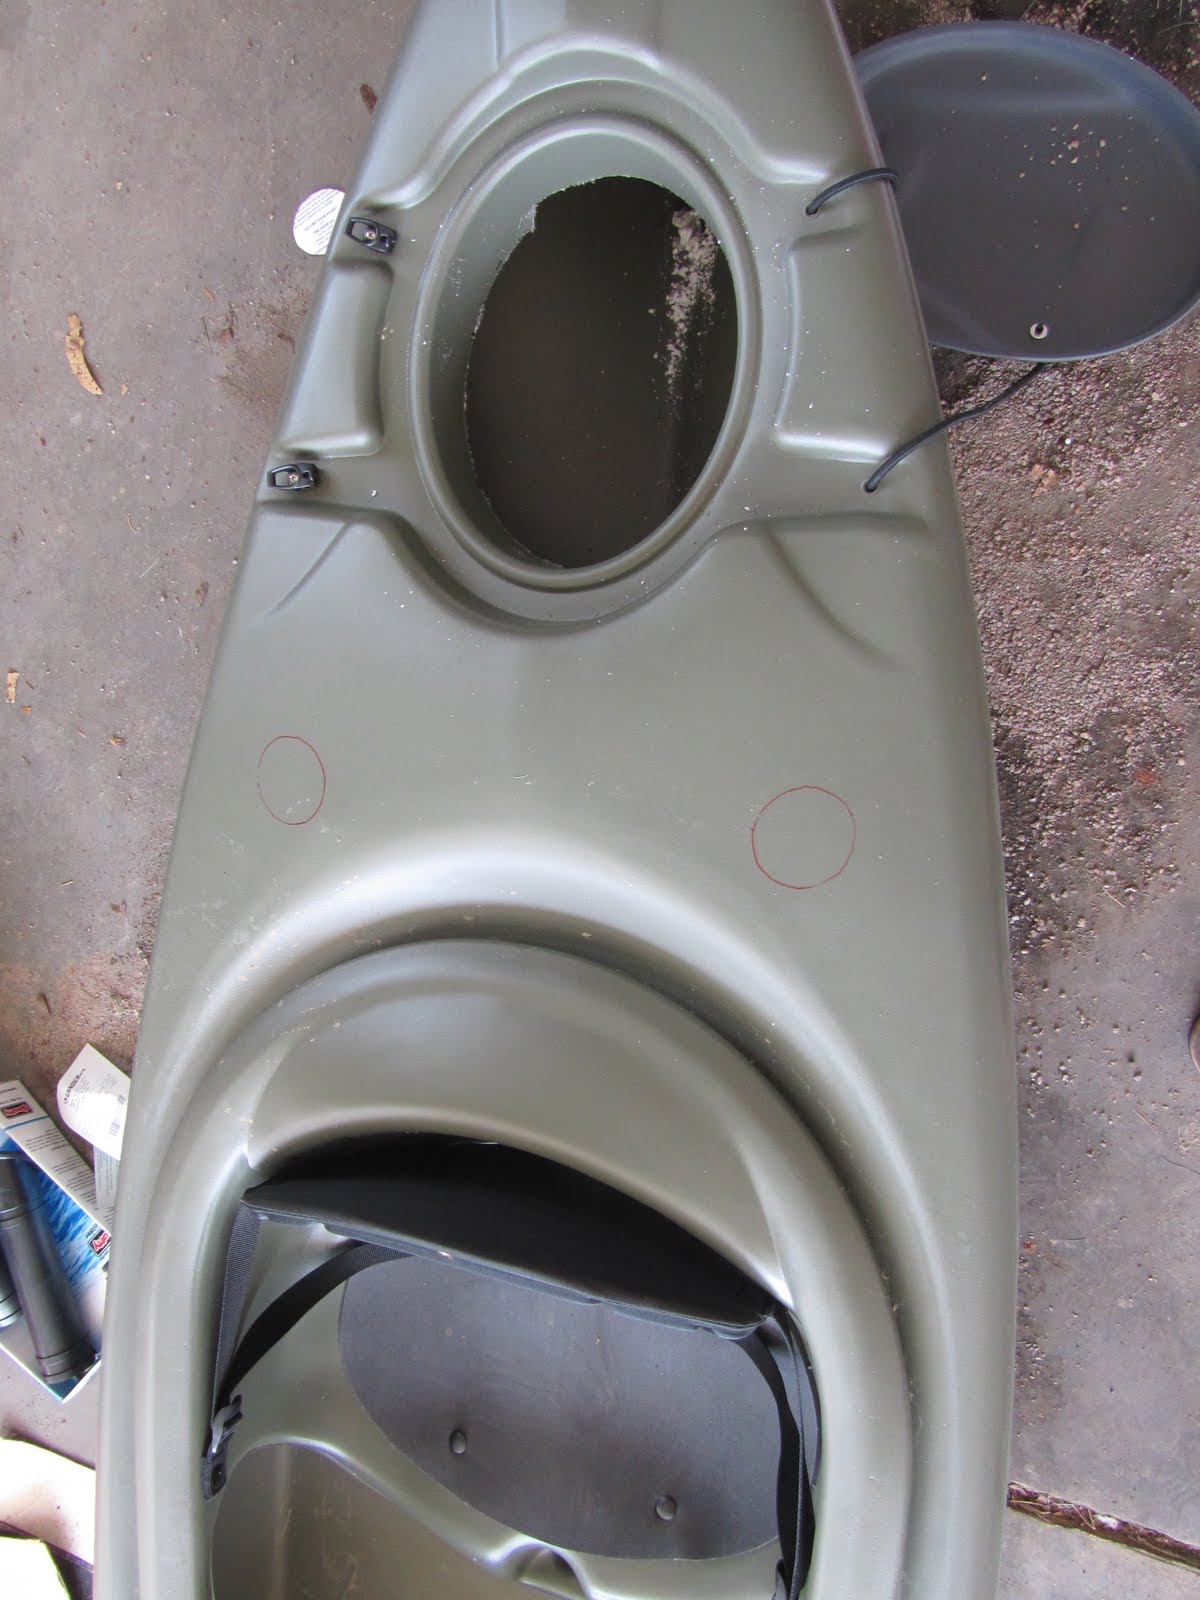


Rear Storage Access

The Potomac 100 ES is a little light on storage space out-of-the-box, so I first cut out the bottom of the rear storage bin so I could access the internal storage behind the seat.

Tools: Ruler, Sharpie, hacksaw blade, utility knife

I marked a dotted line 1 3/4 inches above the base of the hatch with the Sharpie, then scored it with the utility knife so my hacksaw blade would have an easier time tracking. I cut all the way through on one side about two inches long with the utility knife so I could get through.

Then, I hacksawed it all the way around until it was out. The hole wasn't perfect but it is good enough.

I would have rather used a dremel or drill cutter to get through it but I didn't have those tools and I'm doing this all "on the cheap".

Rear Flush Mount, 45 Degree Angle Rod Holders

I purchased the Angler Kit from Yak Gear with 1 pound grapnel anchor and Scotty Rod Holder for $45. The Marine Goop came from Menards in the paint and adhesive section.

Tools: Sharpie, Drill, Drill Bit, Jigsaw, Marine Goop, 6 nuts, 6 bolts

I first sat in the kayak and made sure that where I intended to put the two rod holders would not interfere with my stroke when rods were in them. I also wanted to angle them to the side so that I could still navigate narrower inlets and streams, as well as see the rods out of the corner of my eye while trolling. So, I angled them to the back of the kayak some.

Then off to work!

1. I cut out the ovular pattern provided and positioned it where I wanted my rod. I marked the spot with a red Sharpie. Then, I drilled a pilot hole for my jigsaw with my drill using a 3/8 inch bit.

2. Cut hole with your jigsaw.


3. Repeated #1 and #2 for the other hole. I made sure to clean the surface and remove all the burrs from the holes. This is important for a watertight seal.

4. I played around with the rod holder in the hole- you'll have quite a bit of movement available here so don't worry about cutting the ovular hole perfectly in line with the direction you ultimately decide them to point.

I got my marine goop ready!

Once aligned I used a sharpie to mark where the screws would mount the rod holder to the kayak and drilled them out with a 5/16" bit. I'll be mounting mine with machine screw, nut, and washer on the back side.


5. I slathered marine goop all over the rod holder and put some IN the mounting holes I just drilled. No water leakage is the goal!


6. Insert the rod holder into your hole and align it with the holes, then insert the screw into the top and screw it into the kayak with enough thread exposed to thread the nut and washer on the back end.

Your hands will get goopy. It's ok.

Using a screwdriver and wrench, hand tighten each bolt. Don't overtighten. Snug but not stressed.

Wipe up the excess goop with a wet paper towel or rag.


Flip-Down Paddle Clips

I bought the flip down clips because I wanted the clips to interfere with my paddle stroke as little as possible. I figure they are less likely to tangle fishing lines as well if they are out of the way.

First thing I did was decide which side I wanted to store the paddle on. I picked the right side because I'm righthanded and need to make sure the paddle is accessible as easily as possible if I need to grab it. I intend to put the most often-used Scotty rod holder to my front left for holding a pole for up-front trolling and wanted a pole in the way as few times as possible when storing the paddle as well.

First thing was to make sure the clips would be out of the paddle stroke area. I sat in the kayak and made sure my stroke would not go over the clip. I endured good-natured cajoling from my wife in the process as I sat in the garage pretending to be kayaking.

I marked the general spot up front and in back. I made doubly sure there would be no stroke interference. I'll be on some whitewater after all and need maneuverability.

I tested the location with clips on my paddle and held into place while I pretended to do stuff in the kayak. Thick skin for the cajoling was again needed.

1. I lined the holes up with a straight edge. (the flexible edge of my tape measure worked well)

2. I marked the holes with a sharpie.

Front: Back:


3. Drilled out the marked holes, then dabbed some Marine Goop on them.

4. Put some goop on the bottom of the base, put the clip into the base, then screwed the entire assembly into the kayak using screwdriver and wrench. I made it hand tight - snug but not stressed.

Scotty Rod Holders


The Scotty Rod holder placement is important. I wanted easy access to their poles, no paddle stroke interference, the best deck access I could get up front, and a secure mount. Securely mounting these, given their large surface area, required me to angle them up the contour of the kayak. A slight loss of deck access but better to have a secure mount. Repositioning the mounts causes quite a bit of stress on the kayak structure so I didn't want anything bent or compromised over time.

1. I removed the rod holder and positioned the base where I wanted it. Then, I drilled through with the drill. My sharpies weren't long enough to mark a spot for a cleaner drill through and pattern.

My holes left some plastic on the inside so I cut the excess off with my utility knife. This worked very well for nice, clean holes.


2. I mounted the rod holder base to the kayak. I put a little goop in each hole, the edges of the rod holder base, and then attached them with the machine screw, nut, and washer. Make sure your washers will be flush once fully screwed down. I had to find some smaller washers to fit the space, but generally bigger is better with the washers.


3. I let the assembly cure for a while before reattaching the rod holders.


All done! Clean up the excess goop :)

Stern Deck Rigging
The stern area did not have any rigging so I elected to add some. I'd like to be able to put a deck bag, dry bag, crate, or other gear behind me.

First you need to have your design determined including where the rigging will go, what type of connectors you'll use, and the diameter of your bungee.

I went with 1/4" bungee, four pad eyes on the ends, and two j hooks in the middle. I determined to attach the rigging to either end with bungee clips for easier reconfiguration for larger, heavier loads. (It's best to put larger, heavier loads on the back if you cannot get it in the middle of the kayak.)

What's the process for installing rigging connectors?
For attaching hardware, I use machine screws, washers, and nuts where possible as opposed to
rivets. It's stronger and easier to fix if it gets loose. Rivets require drilling out and can more easily bend or deform. I also use marine goop.

First, lay out all the connectors according to your design.

Mark each hole you need to drill with a sharpie. Deburr each hole.


Put goop in the holes and on surface contacts, then attach with the
hardware. Give each connector some time to cure before putting a load on it so the goop can cure.

Finally, run the cord through the loops and attach. I used a simple square not to attach two cords.


Here's my completed stern rigging.


Bow Deck Rigging


I chose to reconfigure the bow rigging by extending it all the way to the end. I cut the bungee cords already attached to the kayak where they were connected in the middle of the bow and reused the holes. I couldn't reach underneath to use washers, bolts, and nuts, so I used rivets for them. I reused the existing j-hooks that are by the cockpit.

I had a piece of bungee left over from the stern rigging that I spliced into the original bow bungee using two square knots. Now I have more storage and bungee on the bow deck.

Anchor Kit
Now it's time to install the anchor kit!

First thing I did was find a place for the anchor cleat. It needed to be close to the cockpit, somewhere sturdy and flat, yet out of the way of my paddle stroke. Also, it needed to be on the side with less casting action which in my case is on my left side - also away from the paddle clips. Port will be the side the trolley needs to go on anyways since the paddle would interfere with its operation.

The anchor cleat was easy to install. Drill a couple holes, slather on the goop, then attach with hardware.


Anchor Trolley
I bought a bunch of inexpensive hardware to build the anchor trolley. The anchor needs to be port side so it can operate freely and be next to the cleat.

The trolley is completely removable and is attached between the bow's handle and the eyelet I installed behind my flush mount rod holder.

First, I created a double-looped bungee tied to itself with a square knot at each connection point. This helps cushion the kayak when anchored so you're not getting jerked around.

Clip a carabiner to each bungee loop.

Attach a 1/4" pulley to the bow's carabiner. (I'm using 1/4" rope.)

Run your rope. I'm using inexpensive, yellow, 1/4" neoprene rope.

Run your line through the stern's carabiner, through the 2" O Ring, then through the pulley at the bow. Bring it back to the O Ring and make sure you've got an extra foot or so.

Now's the fun part: Playing with fire and zip ties.

Loop the rope through the O Ring and double it up. Measure out your rope - a little slack is ok then cut it.

Put two zip ties on each side of the O Ring, partially zipped down - not all the way tight - loose enough to move over the doubled rope.

Melt a portion of the doubled up rope close to the O Ring using a lighter. Then, quickly move your zip tie over the spot and cinch it down tightly. Use your lighter to heat up the area where the zip tie is cinched down. This will fuse it all together and make for a very strong connection.

Do this four times of course - two times on each side.

We now have our trolley line hooked up! It can easily be detached when we don't want to use it.

Finally we have pimped our kayak!!!


Wednesday, May 11, 2011

Leadership lessons from a few thousand years ago


Recently I went on a tangent when someone told me that wwwaaaaaay back when - before there were kings in the Jewish community, one of the requirements was that kings write out the Jewish law by hand.

The purpose was to make sure kings knew and understood how to govern well. How to lead. What kind of principles they should follow.

The King
14 When you enter the land the LORD your God is giving you and have taken possession of it and settled in it, and you say, “Let us set a king over us like all the nations around us,” 15 be sure to appoint over you a king the LORD your God chooses. He must be from among your fellow Israelites. Do not place a foreigner over you, one who is not an Israelite. 16 The king, moreover, must not acquire great numbers of horses for himself or make the people return to Egypt to get more of them, for the LORD has told you, “You are not to go back that way again.” 17 He must not take many wives, or his heart will be led astray. He must not accumulate large amounts of silver and gold.

18 When he takes the throne of his kingdom, he is to write for himself on a scroll a copy of this law, taken from that of the Levitical priests. 19 It is to be with him, and he is to read it all the days of his life so that he may learn to revere the LORD his God and follow carefully all the words of this law and these decrees 20 and not consider himself better than his fellow Israelites and turn from the law to the right or to the left. Then he and his descendants will reign a long time over his kingdom in Israel.

The main things I get from the above are that kings (leaders) need to know what is right and wrong. To be forward thinking (don't turn back!). They need to be able to focus intently. They need to be void of pursuits that will bring them down like the worship of money and women. They need to keep what is good in front of them at all times. They need to remain humble - a servant leader - and this is what causes success of "themselves" - not their self-promotion, pursuit of glory, or exercise and acquisition of power, but God as he works through them in their naturally good actions that come from this type of leader.

------------------------------------------------------------------------------------

I was then reading Proverbs 31 (Proverbs is my favorite book). Normally this chapter is used to extol the beauty of a good woman. However, I noticed that the first part of the chapter - which is often overlooked - is about a mother, inspired by God, training her son to be a future king - a leader. Its shows not only the value of a wise mother, but also speaks on leadership.

Here's what she tells him:

Sayings of King Lemuel
1 The sayings of King Lemuel—an inspired utterance his mother taught him.

2 Listen, my son! Listen, son of my womb!
Listen, my son, the answer to my prayers!
3 Do not spend your strength[a] on women, your vigor on those who ruin kings.

4 It is not for kings, Lemuel—
it is not for kings to drink wine, not for rulers to crave beer, 5 lest they drink and forget what has been decreed, and deprive all the oppressed of their rights.
6 Let beer be for those who are perishing,
wine for those who are in anguish!
7 Let them drink and forget their poverty
and remember their misery no more.

8 Speak up for those who cannot speak for themselves, for the rights of all who are destitute.
9 Speak up and judge fairly; defend the rights of the poor and needy.


What strikes me about this advice is what leaders are to focus on, and traps they are to avoid.

Don't go the way of substance abuse, make women an idol, or spend your time with fools that suck the life out of you.

Instead, listen to wise counsel, don't be ruled by pleasure, speak up for those who can't speak or don't have a voice - the little guy. Be level-headed and vocal. Defend the rights of the poor and needy.

Obviously there is fairness involved - you don't then turn on the prominent or wealthy to take them down. The warning is to avoid the trap of neglecting the little guy while you are drawn to spend your time with those that you think can help you more.


This humility in leadership has to be a big part of why Jesus rode into down on a donkey instead of as we might as a king. I think it's ironic how he chose to borrow someone's donkey and ride in by himself while the existing religious institution tried to turn it into a big, politically-triumphant, Messianic entry.


Imagine if Jesus had orchestrated his entrance like one of Kim Jong Il's parades to himself. I'll bet a lot of Christians envision this as the way to "implementing righteousness" in our culture though - through political domination. Yet Jesus didn't establish His Kingdom this way. Hm.


That's powerful stuff, and flying upside down.

Thursday, March 31, 2011

Who owns her property?


On the east side of Indianapolis, on the northwest intersection of German Church Rd and Washington is a little farmhouse that has been there since I remember. A little old lady inhabits the two-story, yellow farmhouse reminiscent of the 1930's. Of course I assume she's always lived there as she's the only one I can ever remember seeing out in the yard cutting the grass or trimming the hedges, which were her normal activities as I'd drive by on my way to or from school, basketball, or a friends' house.

When I was a kid she was on the outskirts of development. Across Washington Street was an open grassy, overgrown area. Across German Church Road was the church that has been there for over a hundred years. No doubt she built her house right across from it. Behind her has always been the cemetery, whose quiet inhabitants are no longer caught up in the hustle and bustle that now surrounds them.

Today she is surrounded by the expanses of the city. There's a Walmart, Sam's club, Steak n Shake, and chains of small businesses across the street. Just down the road is a Meijer, the land on which it sits bought from my classmate's father that owned its previous inhabitant - a driving range. A busline runs right in front of her house, 15 yards from a five lane road. People walk across her lawn to get to their megastore destination, leaving trash and refuse in their wake.

As a young man it was easy getting through that intersection. In fact, just south of it was the stretch of road on which my friends and I would test the upper limits of our cars' speedometers. We'd help the developers carve out the roads they were constructing for the expanding subdivisions by mudding through them in trucks. A few years ago our landscaper told me our subdivision was the area he used to hunt raccoons in.

Things have changed as we've pushed out and gobbled up green space in our pursuit of the American dream. It now takes a lot more time to get through that intersection after work. The southbound German Church lane can be backed up half way to 10th Street. There's only one lane really to speak of, and it never used to be possible to get around the person turning left unless they were really far over.

That all started changing a few years ago. A major road project to beautify Washington Street was commenced, widening the street in the process. They rebuilt the intersection. Boy was it painful driving through the Meijer stoplight for those months! Yet we took that extra few minutes out of our day out of respect for the construction crew so that they could accomplish their work.

Something else changed too. They started trying to widen German Church Rd and squeeze more space for cars. You can now get two cars through there, juuust for the first few carlengths. AND there's now a divider line to make two lanes.

I started seeing the little yellow house's elderly inhabitant more. These days she isn't always her normal, peaceful self out trimming hedges, planting flowers, or cutting the grass. There is sometimes anger in her appearance as I drive by and she's in conversation with workers on her lawn, just "doing their job". I have seen this many times now. She's clearly not on board with what's going on.

The construction crews use her driveway to turn around all the time. It's been recently paved - perhaps it was a deal they made with each other.

Lately I think they've figured it out. I usually see what I consider to be a "handler" out there talking to her, while other workers just keep at "their job". Good strategy, as the unsuspecting and unfortunate first few workers probably missed deadlines or couldn't work due to the distraction by this lady desperately defending their property. Those poor workers probably had no idea of what they were doing to her!

Today I drove by and she was out there again, giving the "handler" a piece of her mind. There were workers all over her property drawing lines for this and that. A while back they dug up her yard to put in a sewer system, presumably so that those who had decided to move in areas her lawn connected to the city could have the services they wanted.

I've never talked to this lady, but I wonder what she's been through. No doubt the thousands of people that want to be able to travel with greater ease, have the convenience of city utilities, and walk across her lawn to get where they want to go are pressuring to get more of her property for their sake. No doubt she's been up against a modern day Goliath.

Yet its clear to me that the infringement on her property - even just a liiiiiiitle bit - is something she does not believe is beneficial to her. I'm not sure, but no doubt she's been offered money for the property. No doubt she's gotten fun little letters in the mail from this or that person in this or that office via this or that attorney. No doubt government bureaucrats have spent plenty of time figuring out how they can wrest control of more of her property from her so the people that vote for them will get their conveniences. Surely that's not what they're thinking, but that's what they're doing.

Yet there she stands. Every time somebody is busting up her property she is on them like a hawk.

Reminds me of the move "Up".


I think they're putting in a sidewalk now, and I could tell by the look on her face this morning she doesn't like that one bit.

How much of your property should be allowed to be taken from you so that everyone else can travel with more convenience? Is how long I sit in traffic a matter of life and death? If it is, did I impose that on myself by my Is it a matter of convenience and selfish desire of the many at the expense of the few? What percentage of people should determine when we can take from others for our own convenience?

Is the property theirs? Is it theirs on our terms?

Is it ok for me to take from others for my own convenience? What about a large group of peoples' convenience?

I don't like the situation. Granted I'm making some assumptions based on what I've observed in terms of personal interactions and what I've seen go on. Perhaps they could take her property entirely but have refrained. Perhaps she's just overly controlling about something she's agreed to in terms of her property use. I don't see that. Why not just move?

I'd much rather be a part of a society where the many cherish the sanctity of an individual and their happiness so much that - even though it inconvenience them - they will not confiscate others' property through the legal system. Lurking behind that concept is the premise that the strong can just plow over the weak and take from them as long as they make a law to allow it.

Yet they miss the bigger picture. THEY are the ones that have moved into an area they desired - no DEMANDED - to have certain expectations of travel and amenities so much that they are willing to FORCE others give up their property so they can get them - NOW.

I am going to take a bit of your front lawn so that instead of respecting what is yours, I can cease walking across it and getting my feet muddy and walk across it in a way that keeps me cleaner more quickly.
I am going to take a little bit more of your lawn so that I don't have to sit at a stoplight a little longer. I have a right to convenient and speedy travel from my house, even though you were here when I built it and its my fault I picked my location without thinking about the future.
I am going to force you to put something in your yard so that I can have better sewers, gas lines, and less water in the street I drive on. Nevermind it wasn't that way when I bought my property.

It's ok for me to do this to you because there are a bunch of people who feel the same way.


In reality there's not much you can do about it if you're the weak in this situation. Sure, you can "fight city hall", but unless you have an endless pile of money - you're not going to do much of anything. It is nothing for "city hall" to have a few attorneys that would cost anyone else thousands of dollars to just sit on you, answer every response you can come up with, dig through statutes to drum up something they can use to get what they want from you, and make your life miserable by miring you in legal battles.

In reality you are going to spend a ton of money getting a fair price or trying to hold onto what is yours that will ultimately result in less in your pocket than if you'd just taken a lowball to begin with. That or you'll spend a ton and get nothing. We've passed a law that says were allowed to do this - it has to be right - it is the law, right?

I have half a mind to stop by and introduce myself next time I see her. I wonder what her story is. I wonder what she's been through.

Tuesday, March 22, 2011

Tuxedo t-Shirts are the secret to 10 years of marriage


Almost 10 years ago Amber and I were on the eve of our wedding. We were engaged - still single technically, but not quite. We had our rehearsal dinner the night before the wedding.

I had taken the day off work to finish up the odds and ends of some things for the honeymoon and wedding. I don't remember being terribly busy or stressed about it.

The evening came and it was time for the rehearsal at the church. It seemed surreal now that I reflect on it. I remember the sanctuary being dark, almost candle lit. I remember a fairly jovial feel to it. Life's meant to be enjoyed not trudged through after all!

I wore all black and a black tuxedo t-shirt mostly as a pun in "practice" for the real tux at the wedding. Everything else was a rehearsal, why not the wardrobe? It was also in part to mark the passing of an old life and the coming of a new one - both happening at the same time, yet to be finally transitioned the next day.

I don't remember much about the actual practice. I think the men and ladies stayed mostly in their own circles - seems to happen that way I've noticed in other weddings and rehearsals too. Ironic, huh? I do remember we didn't have the musicians there for the practice.

I recall feeling like it was an out of body experience the whole evening. It was like I was watching myself get married and observing this lovely young lady I was going to pledge the rest of my life too bounce around the room and grace me with her presence. Surreal.

The look on my mom's face said it all when I was practicing descending the stairs with Amber on my arm after having just been pronounced man and wife. The pastor did this without actually saying it of course - that was reserved for when it was real. There were tears in mom's eyes, tears of joy - she was watching her son grow up and leave her.

The rehearsal dinner was wonderful. My parents had a lady in the church make the food - it was great - especially the desert tray which I remember. The room was nicely decorated. It felt a little awkward sitting there, especially when mom started tinkling on the glasses to get us to kiss.

I remember there being some powerpoints of us growing up.

What I remember most was that I couldn't sleep that night. I was up until about 3 or 4 AM. It wasn't that I was nervous or anxious or excited. I think the best word I can use to describe it is that I was feeling the immense gravity about what I was about to undertake. I was embarking on a mission - a mission to love one woman as best I could for the rest of my life. Period. After a while I decided to write Amber a letter. I remember sitting there on that couch in my apartment and penning it. She still has it.

Amber, I love you. Here's to another 10 years, and then another 10, and then another 10, and then another 50.

I'm still on that mission.